
How to Make the Perfect Jammy Egg: A Step-by-Step Guide
Mastering the art of the perfect jammy egg isn’t just about getting the timing right—it’s about understanding the nuances of egg preparation, cooking techniques, and even how to peel them effortlessly. Whether you’re craving a decadent addition to your ramen, a savory complement to your salad, or simply the perfect snack, this guide will walk you through every step. Let’s dive in and uncover the secrets to achieving that delightful jammy yolk and firm, tender whites.
Introduction
What is a Jammy Egg?
When someone mentions a jammy egg, they’re referring to a perfectly soft-boiled egg where the yolk is neither fully set nor runny, but instead has a luscious, custard-like consistency. The whites, on the other hand, should be firm yet delicate. A true culinary treasure, jammy eggs are versatile and elevate the flavor profile of countless dishes.
Why Jammy Eggs Are So Popular
There’s a reason why jammy eggs have become a foodie obsession. They’re quick to prepare, endlessly customizable, and offer a texture that adds a unique twist to savory dishes. These eggs are a staple in cuisines worldwide—think ramen bowls, grain salads, or even simply on toast. But beyond their use in recipes, the satisfaction of nailing the consistency is part of their charm!
Culinary Uses of Jammy Eggs
Jammy eggs can turn any meal into something extraordinary. Here are some ideas:
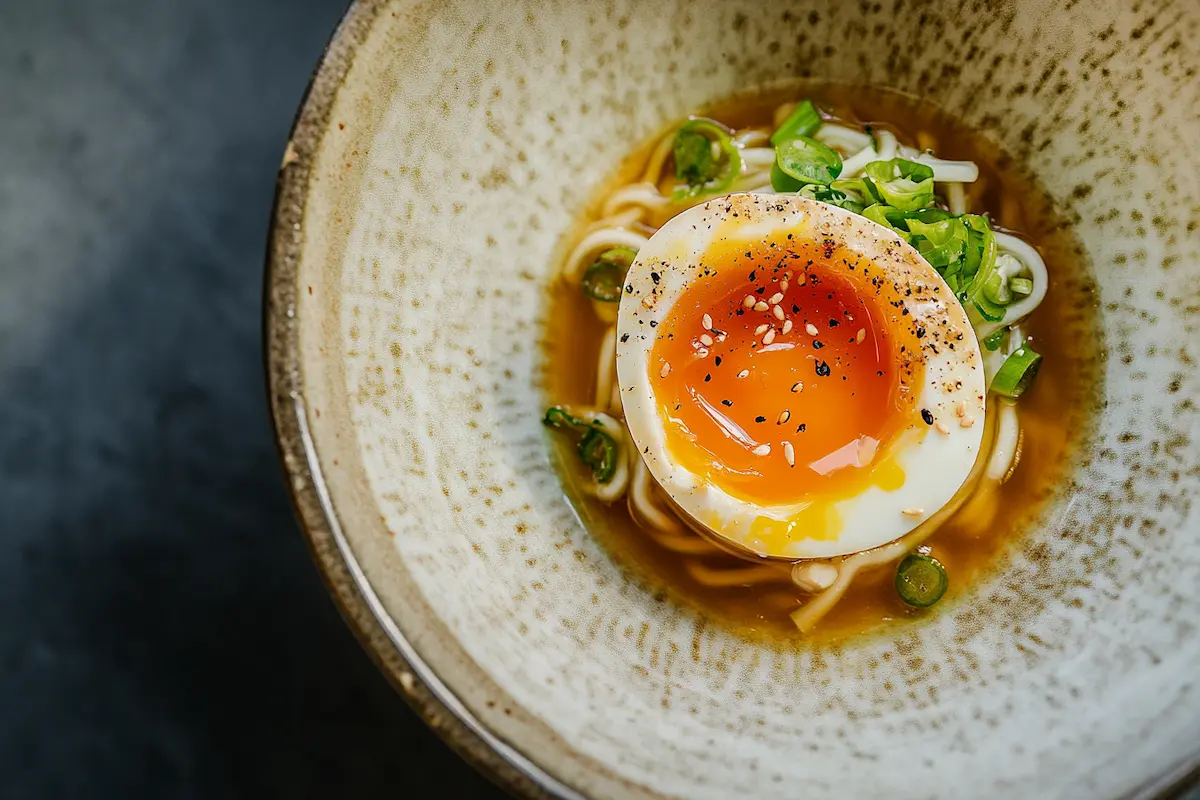
- Ramen: Adds a silky richness to your bowl.
- Avocado Toast: A jammy egg sliced atop your toast takes breakfast up a notch.
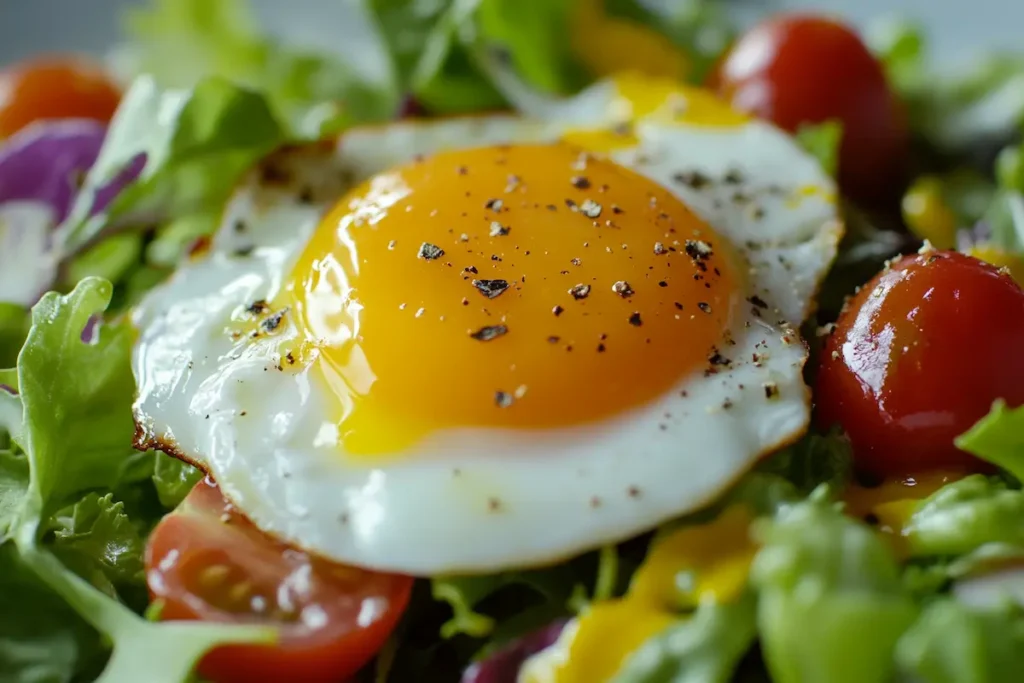
- Salads: Their yolky goodness pairs wonderfully with fresh greens.
- Snacking: Sometimes, simplicity is best. A sprinkle of salt and pepper is all you need.
Whether it’s their visual appeal or their melt-in-your-mouth quality, jammy eggs are the perfect balance of elegance and ease.
Essential Kitchen Tools
Before you start, having the right tools at hand will make the process seamless. To create the perfect jammy egg, you’ll need:
- A medium saucepan: Big enough to allow eggs to sit comfortably without crowding.
- A slotted spoon: For transferring eggs safely without cracking.
- A timer: Precision is everything, and a reliable timer ensures accuracy.
- An ice bath setup: A bowl filled with ice water to stop cooking instantly and make peeling a breeze.
These tools ensure you’re set up for success from the get-go. And while you may think the process is simple, it’s these little details that make all the difference.
Understanding Jammy Eggs
What is a Jammy Egg?
A jammy egg is the perfect harmony of textures and flavors, celebrated for its unique yolk consistency and tender whites. Unlike fully boiled eggs with hard yolks or the runniness of soft-boiled eggs, jammy eggs strike the perfect balance. The yolk should be custard-like, rich, and slightly oozy, almost like golden sunshine encased in velvety softness. Meanwhile, the whites remain firm enough to hold their shape but delicate to the bite.
Achieving this texture is no small feat. It requires precision, the right timing, and a bit of finesse. But the results? Oh, they’re worth every second. Once mastered, this egg-cooking technique will undoubtedly become a kitchen staple.
Culinary Uses of Jammy Eggs
The versatility of jammy eggs is what makes them so beloved in kitchens worldwide. Whether you’re looking to elevate a dish or create a quick, satisfying snack, these eggs never disappoint. Here are some of the most popular ways to enjoy them:
- Ramen Bowls: No ramen experience is truly complete without a halved jammy egg nestled beside the noodles. The creamy yolk adds richness to the broth, balancing its salty and savory flavors.
- Salads: A jammy egg can transform a simple salad into a gourmet dish. Its texture contrasts beautifully with crunchy greens, and its flavor pairs wonderfully with vinaigrettes or creamy dressings.
- Avocado Toast: Think avocado toast couldn’t get any better? Add a perfectly cooked jammy egg on top. The yolk seeps into the avocado, creating an indulgent breakfast or snack that’s as nutritious as it is delicious.
- Grain Bowls: Whether it’s quinoa, rice, or farro, a jammy egg provides the finishing touch, adding protein and a luxurious texture to every bite.
- Snack Time: Sometimes, the simplest way is the best way. Sprinkle a halved jammy egg with a bit of flaky sea salt and cracked pepper for an irresistible snack.
From brunch to dinner—or even a quick mid-day treat—jammy eggs are the ultimate versatile ingredient, delivering on both flavor and presentation. With these ideas in mind, you’re already on the path to culinary success!
In the next section, we’ll dive into selecting the freshest ingredients to set yourself up for egg-cellent results.
Selecting the Right Ingredients
Choosing the Best Eggs
When it comes to making the perfect jammy egg, not all eggs are created equal. The freshness and size of your eggs play a critical role in achieving that creamy, jammy yolk and tender whites.
- Freshness Matters: Fresh eggs are essential for firm whites and vibrant yolks. The albumen (egg white) in fresh eggs clings better to the yolk, creating a well-rounded egg that cooks evenly. Additionally, fresher eggs are less likely to crack during boiling, ensuring consistent results.
- Size Considerations: Opt for medium-sized eggs for the best control over cooking time. Larger eggs may require additional seconds to reach the perfect consistency, while smaller ones cook faster, potentially overcooking before you can stop the process.
- Egg Source: Whenever possible, choose high-quality, free-range eggs. Not only do these eggs often boast richer, brighter yolks, but they’re also a more ethical and sustainable choice.
The foundation of any dish lies in the ingredients. By starting with the best eggs, you’re already setting yourself up for jammy egg success.
Water Quality and Additives
Believe it or not, the water you use for boiling your eggs can impact the final result. While tap water is typically sufficient, certain tricks can make the process smoother and your eggs easier to peel.
- Water Quality: Using filtered or distilled water can reduce the risk of impurities that may affect the egg’s shell or the cooking process. Clean water ensures a more consistent boil and keeps your eggs in pristine condition.
- The Role of Additives: Adding a splash of vinegar or a pinch of baking soda to the water works wonders for peeling eggs. Vinegar helps break down the eggshell’s outer membrane, while baking soda raises the water’s pH, making the shell less likely to stick to the egg white.
- Salt or No Salt: Although some believe adding salt prevents egg cracking, it doesn’t affect the peeling process. However, it does add a touch of flavor to any cracks that form, so it’s worth considering for a little extra seasoning.
By understanding these small but significant details, you can make the cooking and peeling process far easier, saving yourself time and frustration. Next, let’s explore the tools you’ll need to bring it all together.
Equipment Needed
Essential Kitchen Tools
Before embarking on your journey to the perfect jammy egg, gathering the right tools is key. While the process may seem simple, using the proper equipment ensures precision and makes the entire experience seamless. Here’s what you’ll need:
- A Medium Saucepan: Choose a saucepan large enough to hold the eggs without crowding them. Overcrowding can lead to uneven cooking, which is a no-no when aiming for that silky yolk and firm white.
- A Slotted Spoon: This tool is essential for transferring eggs safely from boiling water to the ice bath. The slots allow water to drain quickly, reducing the risk of burns or dropping the eggs.
- A Reliable Timer: Cooking jammy eggs is all about timing. Whether you use a digital timer, your smartphone, or an old-fashioned egg timer, precise control over the seconds will guarantee consistent results.
- An Ice Bath Setup: A bowl filled with ice water stops the cooking process instantly, preventing overcooking and locking in that jammy consistency. It also makes peeling the eggs much easier, as the cold water helps separate the shell from the egg.
- Tongs or a Ladle (Optional): While a slotted spoon is ideal, tongs or a ladle can also work for handling eggs gently during the cooking process.
Having these tools ready beforehand ensures that your cooking process goes off without a hitch. Next up, we’ll break down the step-by-step guide to creating flawless jammy eggs.
Step-by-Step Guide to Making Jammy Eggs
Preparing the Eggs
Preparation is the foundation of success when making the perfect jammy egg. Start by bringing your eggs to room temperature. This step minimizes the risk of cracking when the eggs hit hot water, as the temperature difference between cold eggs and boiling water can cause the shells to split.
- Room Temperature Eggs: Take the eggs out of the refrigerator at least 15–20 minutes before cooking. If you’re short on time, you can place the eggs in a bowl of warm (not hot) water for about 5 minutes.
- Inspect for Cracks: Examine each egg carefully. Discard any eggs with visible cracks as they may leak during cooking, affecting both the texture and the cooking water.
Once prepped, you’re ready to boil your eggs with confidence.
Boiling Techniques
Boiling techniques vary, but the two most common methods are starting eggs in cold water or adding them to boiling water. Each method has its merits, but for jammy eggs, precision is key.
- Cold Water Start:
Place the eggs in a pot of cold water, ensuring the water covers them by at least an inch. Bring the water to a gentle boil over medium heat, then reduce the heat to a simmer and begin timing. This gradual temperature increase reduces the risk of cracking and results in evenly cooked eggs. - Boiling Water Start:
Bring a pot of water to a boil before carefully lowering the eggs in with a slotted spoon. This method is faster but requires extra care to avoid cracking the shells. Start timing immediately after the eggs are added to the pot. - Tips for Both Methods:
Use medium heat to avoid overly vigorous boiling, which can jostle the eggs and crack the shells. Also, ensure the water covers the eggs completely for uniform cooking.
Timing for Desired Consistency
The magic of the jammy egg lies in perfect timing. Cooking times vary slightly depending on egg size and personal preferences, but here’s a general timing chart for medium-sized eggs:
| Yolk Consistency | Boiling Time |
|---|---|
| Soft and runny | 5 minutes |
| Jammy and custard-like | 6.5–7 minutes |
| Fully set but soft | 9 minutes |
For jammy eggs, aim for 6.5–7 minutes. Always start your timer as soon as the water begins to simmer or once the eggs are added to boiling water. Precision ensures a consistent outcome.
The Ice Bath Method
An ice bath is the secret to stopping the cooking process in its tracks, ensuring that your yolk remains perfectly jammy.
- Set Up the Bath: Fill a large bowl with cold water and add plenty of ice. The water should be frigid to cool the eggs rapidly.
- Transfer Immediately: Once the cooking time is up, use a slotted spoon to remove the eggs from the hot water and place them directly into the ice bath.
- Soak Time: Let the eggs sit in the ice bath for 5–10 minutes. This not only halts cooking but also makes peeling easier by creating a slight separation between the shell and the egg white.
Peeling the Eggs
Peeling eggs can be a tricky step, but a few techniques can make the process hassle-free:
- Roll and Crack: Lightly tap the egg on a hard surface to crack the shell, then roll it gently to loosen the shell all around.
- Peel Under Running Water: Hold the egg under a stream of cool running water as you peel. The water helps wash away any stubborn bits of shell.
- Start from the Base: Begin peeling from the wider end of the egg where the air pocket is located. This pocket makes it easier to get under the membrane and remove the shell smoothly.
By following these steps, you’ll consistently achieve eggs with intact whites and no unsightly gouges. In the next section, we’ll explore creative ways to serve your jammy eggs to take your dishes to the next level.
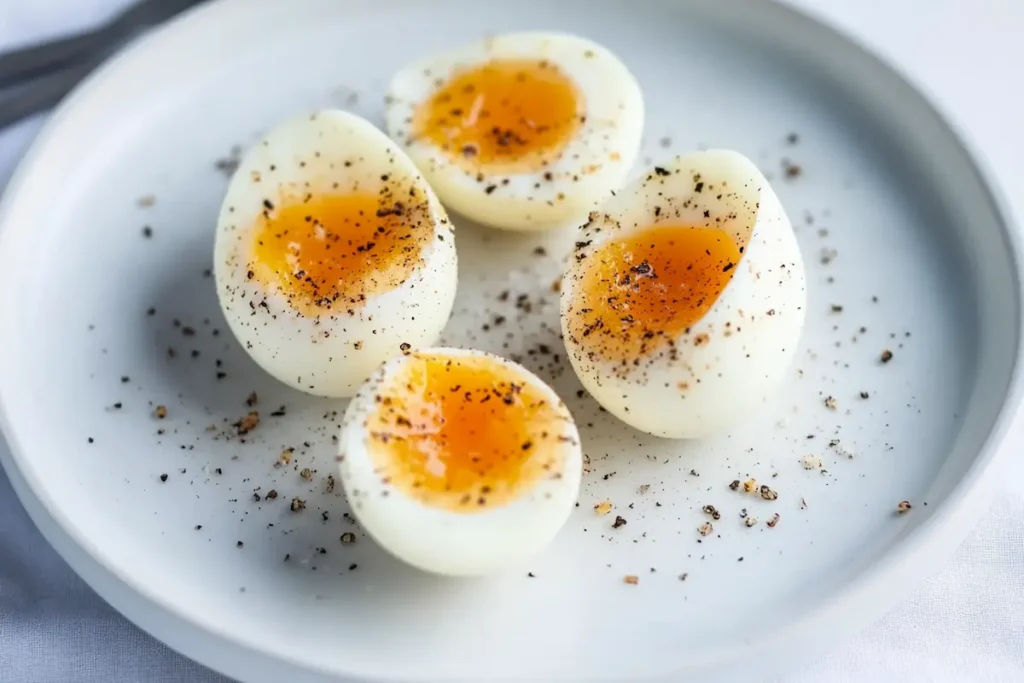
Simple Jammy Egg with Salt and Pepper
Serving Suggestions
Incorporating Jammy Eggs into Meals
Jammy eggs are incredibly versatile, enhancing both flavor and presentation in many dishes. Their rich, custardy yolks and tender whites add an indulgent touch whether you’re making a snack or a gourmet meal. Here are a few ideas to get you started:
- Avocado Toast: Elevate your avocado toast with a halved jammy egg, flaky sea salt, pepper, and olive oil.
- Ramen: Transform your ramen by adding a halved jammy egg; the yolk enriches the broth beautifully.
- Grain Bowls: Crown your hearty grain bowls with a jammy egg for added protein and a luscious, natural dressing.
- Salads: Enhance salads with a jammy egg’s creamy yolk paired with crisp greens and a dressing of your choice.
- Sandwiches & Wraps: Add a jammy egg to your sandwiches or wraps for extra flavor and texture.
- Simple Snacks: Enjoy a halved jammy egg with a sprinkle of everything bagel seasoning or hot sauce for a quick, satisfying bite.
This version retains all the key use-cases for jammy eggs but in a much more concise way. It keeps the focus on the versatility and simple additions that make the most impact.
From breakfast to dinner, jammy eggs add a touch of indulgence to even the simplest dishes. Get creative and experiment—they’re a culinary chameleon that fits into almost any meal. Up next, we’ll cover how to store your eggs safely and enjoy them at their best.
Storage and Safety
Storing Jammy Eggs
Once you’ve mastered the art of the perfect jammy egg, proper storage is crucial to maintain their quality and freshness. Since these eggs are only partially cooked, they require careful handling to prevent spoilage.
- Refrigeration Tips: Place your peeled or unpeeled jammy eggs in an airtight container before refrigerating. This prevents them from absorbing strong odors from other foods in the fridge. If they’re peeled, add a damp paper towel to the container to keep them from drying out.
- Shelf Life: Jammy eggs are best enjoyed within 3–4 days of cooking. While they may still be safe to eat after this period if properly stored, their texture and flavor will begin to degrade.
- Quick Use: If you plan to use your jammy eggs in meals, store them unpeeled and only peel them when ready to serve. This preserves their firmness and makes them easier to handle.
By following these storage guidelines, you can enjoy your jammy eggs at their peak flavor and texture for days to come.
Food Safety Considerations
When handling partially cooked eggs like jammy eggs, food safety is paramount to avoid any risk of illness. These practices ensure your eggs stay safe and delicious:
- Cooling Quickly: Always place your eggs in an ice bath immediately after boiling. This halts cooking and brings their temperature down rapidly, minimizing the risk of bacterial growth.
- Refrigeration Temperature: Keep your refrigerator at or below 40°F (4°C). Eggs stored at this temperature remain fresh and safe for consumption.
- Avoid Room Temperature: Don’t leave jammy eggs at room temperature for more than 2 hours. If they’ve been out longer, it’s safer to discard them.
- Cross-Contamination Prevention: Use clean utensils and containers when handling your eggs to avoid introducing bacteria. Wash your hands thoroughly before and after touching them.
By adhering to these food safety tips, you can savor your jammy eggs worry-free, knowing they’re both delectable and safe to eat. Next, we’ll tackle common issues and how to troubleshoot them for flawless results every time.
Troubleshooting Common Issues for Jammy Egg
Addressing Common Problems
Even with the best techniques, challenges can arise when making jammy eggs. From yolks that stray from that perfect custard-like texture to eggshells that stubbornly refuse to peel, these common issues can throw a wrench into your culinary plans. Let’s address these problems and their solutions so you can confidently achieve flawless jammy eggs every time.
Troubleshooting these issues is all about understanding the details of the process. By following these tips, you’ll master the art of the jammy egg and avoid common pitfalls. Up next, we’ll answer some frequently asked questions to round out your expertise.
Frequently Asked Questions for jammy egg
FAQs about Making the Perfect Jammy Egg
Cooking jammy eggs may seem simple, but there are plenty of questions that come up along the way. Below, we’ve answered some of the most common queries to help you perfect your technique and get the most out of this versatile kitchen favorite.
How can I ensure my eggs peel easily?
Peeling can be tricky, but it’s easier with these tips:
- Use eggs that are a few days old; fresher eggs tend to have shells that stick more.
- Add a splash of vinegar or baking soda to the boiling water to loosen the shell.
- Cool the eggs in an ice bath immediately after cooking, then gently crack and peel under running water.
Can I make jammy eggs in advance?
Yes! Jammy eggs can be prepared ahead of time and stored in the fridge. Leave them unpeeled in an airtight container for up to 4 days to maintain freshness. If you peel them, cover them with a damp paper towel to keep them from drying out.
What dishes pair well with jammy eggs?
Jammy eggs elevate a wide variety of dishes. They’re perfect in:
- Ramen, where the rich yolk enhances the broth’s flavor.
- Grain bowls, as a protein-packed topping.
- Salads, adding a creamy contrast to crunchy greens.
- Toasts and sandwiches, lending a luscious texture.
How do I achieve consistent results each time?
Consistency comes down to precision. Follow these tips:
- Use eggs of similar size for uniform cooking.
- Stick to a strict boiling time (6.5–7 minutes for jammy eggs).
- Always transfer to an ice bath to halt cooking immediately.
Are there variations in cooking times for different altitudes?
Yes, altitude affects boiling. At higher altitudes, water boils at a lower temperature, so eggs take longer to cook. Add an extra 30–60 seconds to your boiling time, depending on your altitude.
What are the nutritional benefits of jammy eggs?
Jammy eggs are not just delicious; they’re packed with nutrition. Each egg contains high-quality protein, essential vitamins like B12, and healthy fats. The partially cooked yolk retains many heat-sensitive nutrients, making jammy eggs a great choice for a wholesome meal or snack.
Got more questions? Dive into the step-by-step guide and tips above to become a jammy egg pro! In our final section, we’ll wrap up everything you’ve learned.
Mastering the Art of the Jammy Egg
Creating the perfect jammy egg is a blend of precision, technique, and a little bit of patience. From choosing the freshest eggs to timing the boil and perfecting the peel, each step contributes to that custard-like yolk and tender white that elevate any dish. Whether you’re a seasoned cook or just starting out, the beauty of jammy eggs lies in their simplicity and versatility.
As we’ve explored, these delectable eggs can enrich your ramen, brighten up salads, crown grain bowls, or even stand alone as a savory snack. By experimenting with timing and creative pairings, you’ll soon discover how seamlessly jammy eggs fit into your everyday meals.
The joy of cooking is about making something both delicious and memorable, and jammy eggs are a perfect example of how small details can make a big impact. So grab your eggs, follow the step-by-step guide, and let your culinary creativity shine. With a little practice, you’ll master the art of the jammy egg in no time!